Safety First: Disconnect the negative battery cable. Park on a level surface, set the parking brake, and allow the engine to cool. Locate the belt routing diagram sticker, often found on the radiator support or strut tower. Wear safety glasses.
Identifying Your Engine
The 2011 Ford Escape uses two possible engines requiring different belt routing:
- 2.5L I4 Engine (L4): Uses a 6-rib serpentine belt.
- 3.0L V6 Engine (V6): Uses a 7-rib serpentine belt.
Required Tool
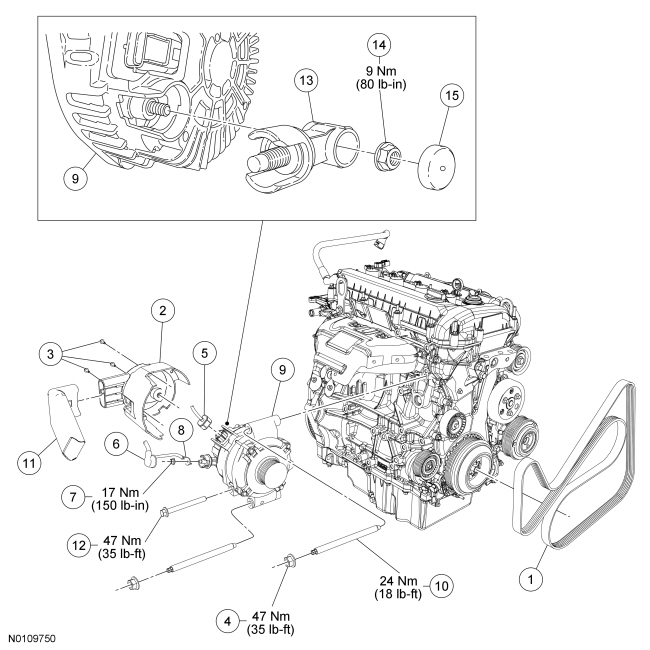
A long-handled 3/8" drive ratchet or breaker bar is essential for operating the automatic belt tensioner.
Belt Routing Diagrams
For 2.5L I4 Engine:
- Crankshaft Pulley (Bottom, center)
- Automatic Tensioner Pulley (Top right, viewed from front)
- Idler Pulley (Top left)
- Water Pump Pulley (Left, below idler)
- Alternator Pulley (Right, above crankshaft)
- Air Conditioning Compressor Pulley (Bottom right)
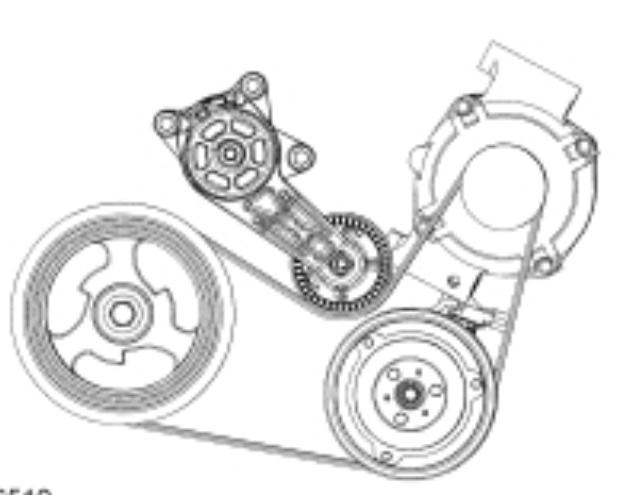
Routing Path: Start at Crankshaft. Wrap clockwise over Water Pump, counter-clockwise around Idler, clockwise around Tensioner, clockwise around Alternator, clockwise around A/C Compressor, back to Crankshaft.
For 3.0L V6 Engine:
- Crankshaft Pulley (Bottom, center)
- Automatic Tensioner Pulley (Top right)
- Idler Pulley (Left, below alternator)
- Power Steering Pump Pulley (Top center/left)
- Alternator Pulley (Top left)
- Water Pump Pulley (Bottom left)
- Air Conditioning Compressor Pulley (Bottom right)
Routing Path: Start at Crankshaft. Wrap clockwise over A/C Compressor, clockwise around Tensioner, counter-clockwise around Power Steering, counter-clockwise around Idler, clockwise around Alternator, clockwise around Water Pump, back to Crankshaft.
Installation Steps
- Locate the automatic tensioner pulley (spring-loaded).
- Insert ratchet/breaker bar into the tensioner's square drive socket.
- Rotate the tensioner clockwise (toward the engine front) to release belt tension. This requires significant force.
- Slip the old belt off one pulley while tension is released.
- Slowly release tensioner pressure and remove the old belt completely.
- Match the new belt part number to the old belt (6-rib vs 7-rib).
- Ensure all pulleys are clean and spin freely without noise or roughness (replace idlers/tensioner if faulty).
- Referencing the diagram sticker and routing paths above, place the new belt onto all pulleys EXCEPT the tensioner pulley. The "FRONT" side ribs should face outward.
- Re-insert the ratchet into the tensioner drive.
- Rotate the tensioner clockwise again to create slack.
- Slip the last section of the belt onto the tensioner pulley.
- Slowly and carefully release the tensioner pressure, ensuring the belt seats correctly into every pulley groove. Verify alignment across all pulleys.
Final Check: Reconnect the battery. Start the engine and observe the belt running smoothly for 30-60 seconds. Listen for squealing or chirping, inspect for wobble, and ensure it tracks correctly on all pulleys. Shut off the engine and re-check belt tension.