Replacing the serpentine belt on a 2012 Chevrolet Impala with a 3.5L V6 engine is straightforward using four basic tools. Follow this guide for efficient, safe DIY belt replacement.
Required Tools
- Ratchet wrench
- 15mm deep socket
- Breaker bar
- Heavy-duty work gloves
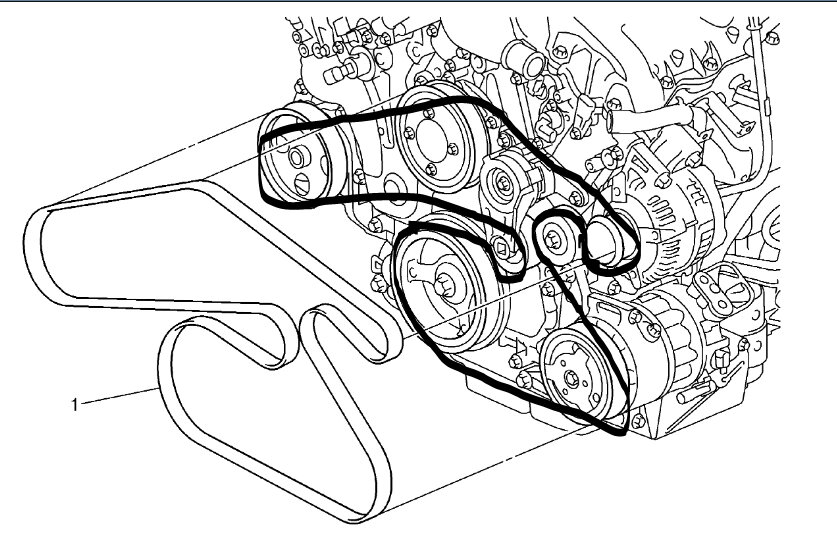
Belt Routing Diagram
The serpentine belt paths clockwise: Crankshaft pulley (bottom right), tensioner pulley (top right), alternator (top middle), water pump (lower left), air conditioning compressor (bottom center), power steering pump (upper left), idler pulley (center). Consult the under-hood decal if visible for a visual reference.
Step-by-Step Replacement Procedure
Step 1: Park the vehicle on a level surface, engine off and cool. Wear work gloves and remove any jewelry.

Step 2: Locate the belt tensioner pulley near the alternator. Attach the 15mm socket to the ratchet wrench, then to the tensioner bolt. Use the breaker bar for extra leverage to rotate the tensioner counterclockwise, releasing belt slack.
Step 3: Slide the old belt off all pulleys, noting the routing. Compare with the diagram to ensure proper removal.
Step 4: Position the new belt over the crankshaft pulley, then follow the diagram routing. Route the belt onto all pulleys except the tensioner last.
Step 5: Again, rotate the tensioner counterclockwise to create slack and slip the belt onto it. Release slowly to engage tension.
Step 6: Verify the belt sits centered on all pulleys and has no twists. Start the engine briefly to check for smooth operation without squealing or slipping.

Safety and Final Checks
- Inspect pulleys for damage or debris before installing the new belt.
- Ensure all tools are clear during engine start-up.
- Confirm belt tension is firm but not overtightened; incorrect tension can cause premature wear.

