
Locating the correct serpentine belt routing diagram for your 2004 Pontiac Grand Prix is essential for safe replacement. Diagrams vary significantly by engine and supercharger configuration. Always verify the specific engine in your vehicle before proceeding.
Determining Your 2004 Grand Prix Engine Type
Identify the engine:
- Base Engine (3800 Series II V6): Naturally aspirated 3.8L V6 (L36 code). Belt drives alternator, power steering pump, water pump, and A/C compressor.
- Supercharged Engine (3800 Series II SC): Supercharged 3.8L V6 (L67 code). Belt drives supercharger, alternator, power steering pump, water pump, and A/C compressor.
- Note: A secondary smaller belt may drive the supercharger snout pulley separately on some SC models. Always confirm.
Standard Routing Diagrams (Without A/C Compressor Bypass)
For Base 3.8L V6 (L36) Engine:
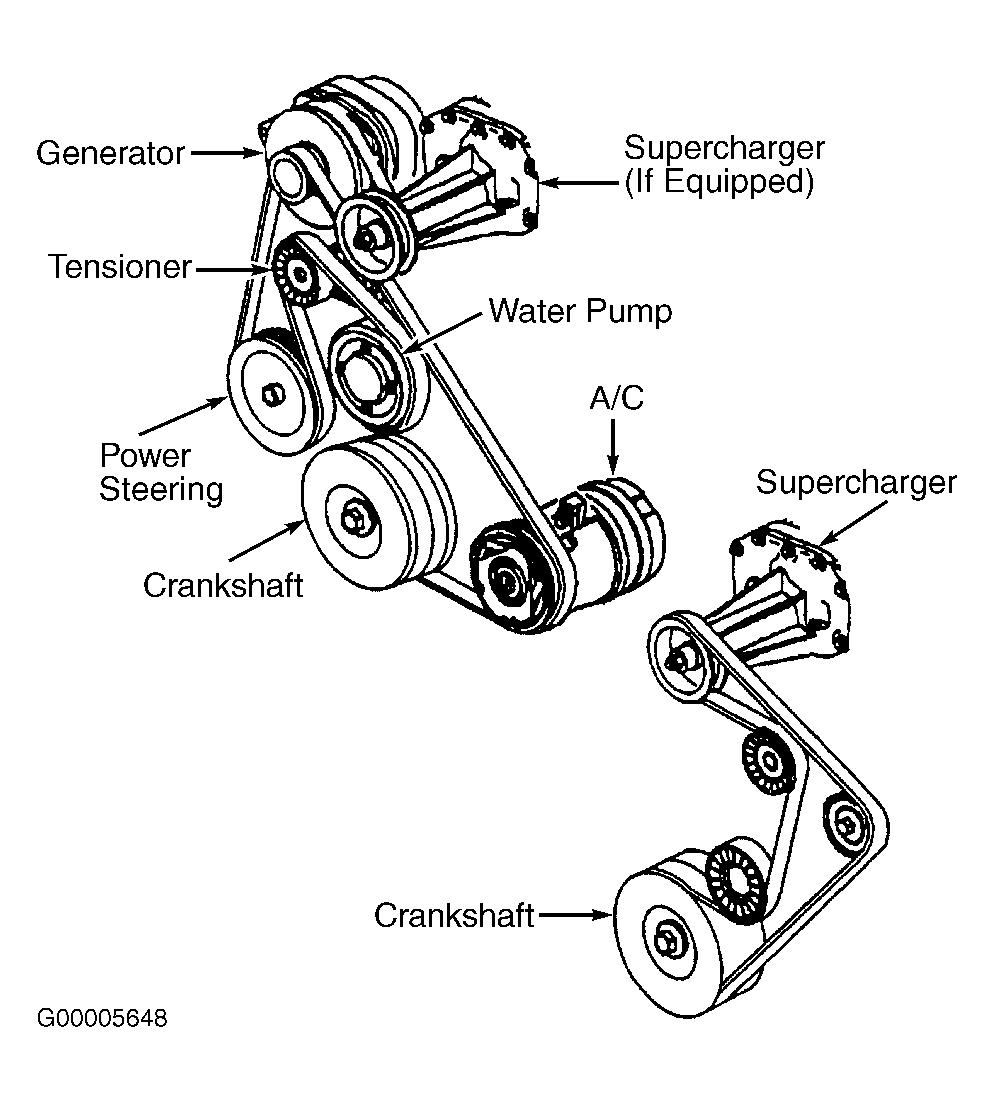
- Crankshaft Pulley (Bottom) → Power Steering Pump (Upper Left)
- Power Steering Pump → Water Pump (Lower Left)
- Water Pump → Automatic Tensioner Pulley (Smooth Side)
- Automatic Tensioner Pulley (Ribbed Side) → Alternator (Top Center)
- Alternator → A/C Compressor (Upper Right)
- A/C Compressor → Idler Pulley (Between Compressor and Crankshaft)
- Idler Pulley → Crankshaft Pulley (Completes loop)
For Supercharged 3.8L V6 (L67) Engine (Typical Primary Belt):
- Crankshaft Pulley (Bottom) → Supercharger Pulley (Upper Left)
- Supercharger Pulley → Water Pump (Lower Left)
- Water Pump → Idler Pulley (Above Water Pump)
- Idler Pulley → A/C Compressor (Upper Right)
- A/C Compressor → Automatic Tensioner Pulley (Smooth Side - Usually passenger side)
- Automatic Tensioner Pulley (Ribbed Side) → Alternator (Top Center)
- Alternator → Power Steering Pump (Below Alternator)
- Power Steering Pump → Crankshaft Pulley (Completes loop)
Critical Installation Tips
- Release Tension Correctly: Use a suitable socket/breaker bar only on the tensioner's square drive lug. Rotate the tensioner clockwise to release belt tension (counter-clockwise on rare configurations - verify!).
- Belt Orientation: Ensure ribs on the belt seat fully and correctly into the grooves of all ribbed pulleys. The back (smooth side) of the belt must contact any smooth idler or tensioner pulleys. Watch for inverted installation.
- Cold Weather: Belts are stiffer when cold. If difficult to route, warming the belt (away from open flame) can increase pliability temporarily. Handle carefully.
Pre-Start Verification & Safety
- Double-Check Routing: Compare your installed belt meticulously against a verified diagram specific to your VIN/engine before releasing the tensioner.
- Inspect Pulleys: Spin all pulleys by hand. They should rotate freely without grinding or roughness. Check for excessive wobble.
- Safety Checks: Ensure all tools are clear, battery negative cable is reconnected, and the ignition is OFF.
- Initial Start: Start the engine and observe the belt operation for at least 60 seconds. Listen for chirps/squeals indicating misalignment or incorrect tension. Inspect visually for any belt walk off pulleys. If any abnormality occurs, turn off the engine immediately and re-inspect.