
Understanding the Problem
A bad wiring diagram in a Dodge headlight switch often indicates damaged circuits, causing flickering lights, failure to turn on, or intermittent issues. Common causes include corrosion, worn connectors, or a faulty switch assembly, prevalent in models like the Dodge Ram or Charger after years of use.
Diagnosing the Issue
Confirm wiring problems with basic tools: a multimeter, gloves, and a flashlight. Start by inspecting the switch harness for loose or corroded connections. If intact, proceed with these tests:
- Check fuses: Locate the headlight fuse in the fuse box (refer to the owner's manual for its position) and test it for continuity using the multimeter.
- Test voltage: Set the multimeter to DC voltage and probe the switch terminals with headlights on; a reading below 12V indicates a wiring fault.
- Inspect for physical damage: Look for frayed wires, burns, or moisture intrusion near the switch, signaling short circuits.
How to Fix It Fast Today
Address the issue efficiently in under 30 minutes using common tools like screwdrivers and a new switch (if needed). Follow this sequence for a quick resolution:
- Access the switch: Safely disconnect the battery, then remove the dashboard trim and switch assembly (typically secured by screws).
- Clean contacts: If corrosion is present, gently scrub terminals with electrical contact cleaner and a wire brush. Reconnect tightly.
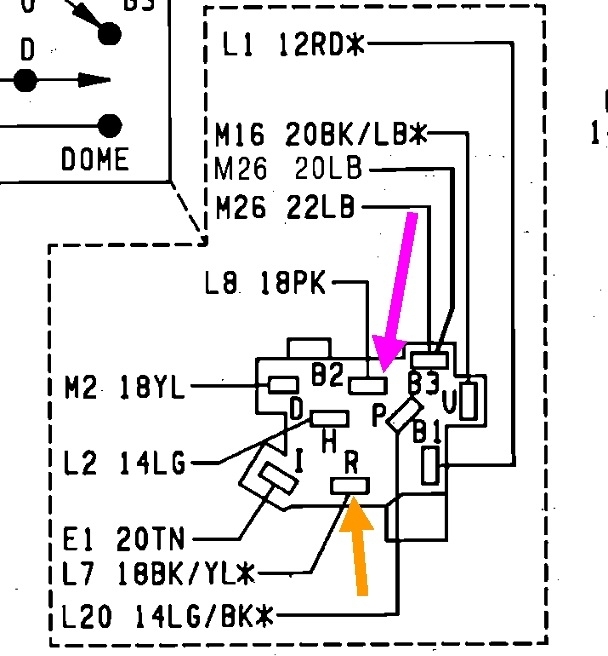
- Replace faulty components: Install a new headlight switch (compatible with your Dodge model) if damage is irreversible—ensure proper pin alignment based on the standard diagram (e.g., pin 1 for ground, pin 2 for low beams).
- Reassemble and test: Reconnect the battery, power on the headlights to verify function before finalizing trim installation.
Preventative Measures
Avoid future failures by regularly inspecting wiring for moisture or wear during maintenance. Apply dielectric grease to connectors to prevent corrosion and ensure long-term reliability.