Squeaking belts on your Honda Odyssey usually indicate insufficient tension, misalignment, a worn/damaged serpentine belt (which drives both the alternator and AC compressor), or a failing accessory pulley/idler. Prompt diagnosis prevents belt failure and component damage.
Diagnosing Odyssey Belt Squeak
- Condition & Tension: A worn belt (glazed, cracked, frayed edges) or incorrect tension is the most common cause of squeal. Belts often loosen as they age.
- Pulley Alignment: Bent brackets, worn mounts, or damaged pulleys can cause misalignment, creating drag and noise.
- Pulley Bearings: Seized, rough-spinning, or noisy idler pulleys, tensioners, or accessory pulleys (AC, Alternator, P/S Pump) create friction.
- Contaminants: Oil, coolant, or power steering fluid leaking onto the belt significantly reduces grip.
Honda Odyssey Serpentine Belt Routing Diagram (Typical V6 Engine)
- Confirm your specific model year and engine before proceeding. Route varies slightly.
- General Routing Path (Viewed from Front of Vehicle):
- Crankshaft Pulley (Bottom Center)
- Over the top of the Power Steering Pump Pulley
- Under the Idler Pulley (Often a smooth pulley)
- Around the Alternator Pulley
- Around the Air Conditioning Compressor Pulley
- Around the Tensioner Pulley (Ribbed side contacts this)
- Back to Crankshaft Pulley
- Labeled pulleys are crucial for correct installation. Always reference your vehicle's underhood decal.
Common Repair Solutions
- Verify Belt Tension: Using a serpentine belt tension gauge is the most accurate method (follow manufacturer specs). Otherwise, on a cold engine, press firmly on the longest belt span between pulleys. Deflection should typically be around 1/4 inch. Refer to service manual specification.
- Adjust Tension (If Applicable): On older models with manual adjusters: Loosen pivot and adjustment bolts, pry accessory (like alt/AC comp) to increase tension, tighten bolts to spec (crucial!). Torque spec is critical to prevent movement.
- Replace Belt: If tension is correct and belt shows wear/damage/contamination, replace it immediately. Use the exact OE specification (length/width/rib count).
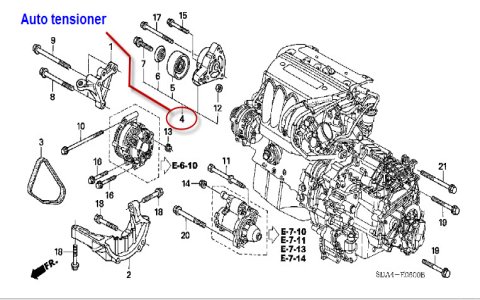
- Inspect & Replace Tensioner: A faulty auto-tensioner is extremely common. Ensure smooth movement and strong spring action. Replace if worn, binding, or the indicator is out of range. Torque replacement correctly.
- Inspect All Pulleys: Spin idlers and accessory pulleys by hand. They should spin freely with zero play, roughness, wobble, or noise. Replace any suspect pulleys. Check alignment visually with a straightedge.
- Clean Components: Wipe pulleys clean with brake cleaner (do not get on belt!) to remove debris/grease.
- Fix Leaks: Address any oil, coolant, or PS fluid leaks contaminating the belt area.
Procedure Summary
Relieve tension using the auto-tensioner wrench lug. Remove belt, inspect ALL pulleys thoroughly, replace faulty components and/or belt, route new belt exactly per diagram, slowly release tensioner. Verify belt alignment. Start engine and listen.