2004 Jeep Grand Cherokee 4.0L Serpentine Belt Replacement
This guide covers the essential steps for replacing the serpentine belt on a 2004 Jeep Grand Cherokee equipped with the 4.0L inline-six engine.
Necessary Tools & Safety
- New Jeep Grand Cherokee 4.0L-specific serpentine belt
- Serpentine belt tensioner tool (long-handled ratchet or breaker bar, typically 1/2" drive)
- Safety glasses
- Work gloves
- Flashlight
- Ensure the engine is OFF and COOL before starting.
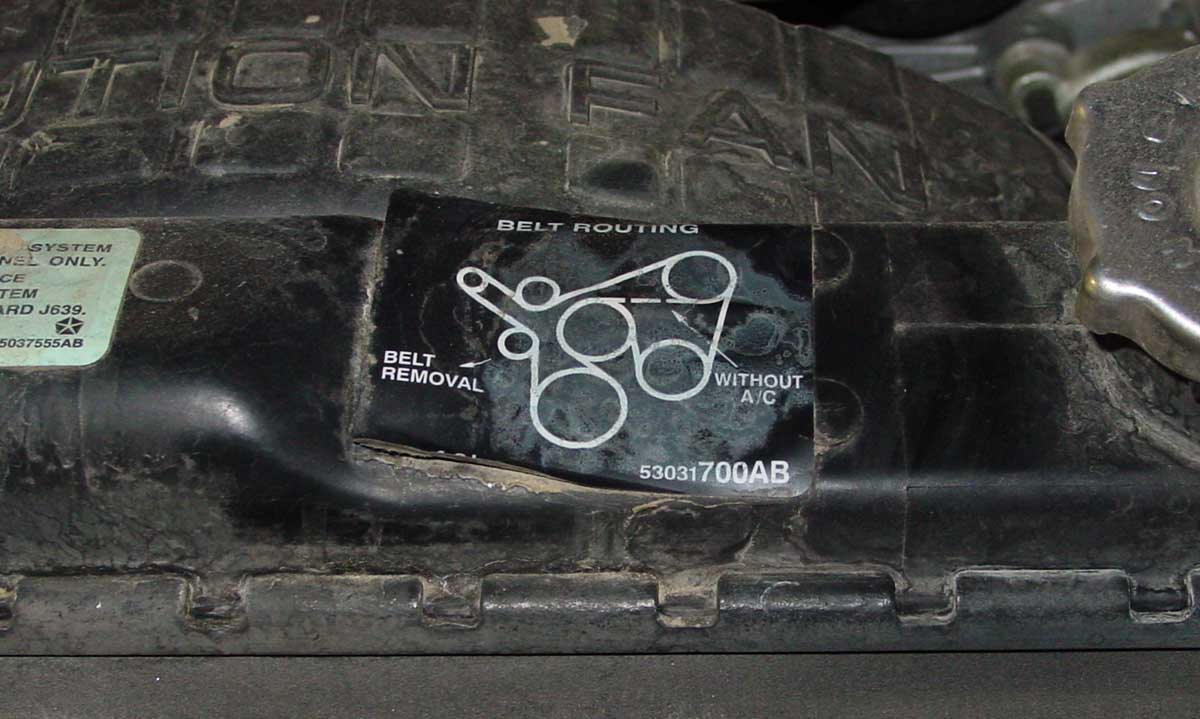
Locating Belt Routing Diagram
A critical routing diagram is typically found on a sticker attached to the underside of the hood or near the radiator support. Verify this diagram exists before belt removal.
Replacement Procedure
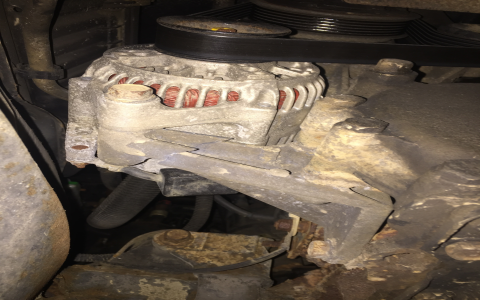
Step 1: Identify the Belt Tensioner
Locate the spring-loaded automatic belt tensioner pulley. It's usually positioned centrally on the engine front.
Step 2: Release Tension
Insert the tensioner tool into the square socket on the tensioner arm. Rotate the tensioner slowly and firmly clockwise (as viewed from the front of the engine) against the spring pressure. This releases tension, creating slack in the belt.
Step 3: Remove Old Belt
While holding tensioner pressure, slip the old belt off the tensioner pulley first. Carefully guide it off the remaining pulleys (alternator, power steering, water pump, idler, crank). Note the belt's path against the diagram.
Step 4: Verify Correct Routing on Diagram
Double-check the routing diagram on the hood sticker. Ensure you understand the exact path the new belt must follow around all pulleys.
Step 5: Install New Belt
Route the new belt onto all pulleys EXCEPT the tensioner pulley first. Route it carefully, matching the diagram exactly. Ensure the ribbed side engages on all grooved pulleys.

Step 6: Re-engage the Tensioner
Again, use the tool to rotate the tensioner clockwise. Slide the belt onto the tensioner pulley last. Slowly release pressure on the tensioner tool, allowing the tensioner pulley to clamp the belt.
Step 7: Final Checks
- Visually confirm the belt is correctly seated in all pulley grooves per the diagram.
- Pull the belt gently between long spans. It should deflect only slightly (approx. 1/4" to 1/2") under moderate finger pressure – the automatic tensioner handles correct tension.
- Check that nothing (tools, debris) obstructs belt movement.
Step 8: Test Operation
Start the engine briefly. Observe the belt immediately: It should run smoothly, centered on all pulleys, with no flapping, squealing, or signs of tracking off. Check accessories like headlights and A/C function normally.
Important Notes
- NEVER use tools on the tensioner pulley nut itself; use only the designated square hole on the tensioner arm.
- Re-routing without the diagram is error-prone and risks damage. If diagram missing, sketch the routing meticulously before removing the old belt.
- Ensure the engine is cool to prevent burns.
- Use only a belt specified for the 2004 Grand Cherokee 4.0L.