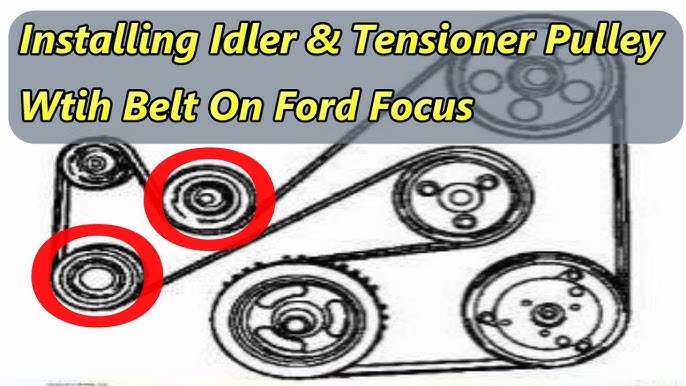
Correct serpentine belt routing is critical for 2008 Ford Focus models equipped with the 2.0L Duratec engine (non-turbo). Incorrect installation causes rapid belt wear, accessory failure, or immediate slippage. Follow this diagram precisely:
Serpentine Belt Routing Path (Clockwise)
- Crankshaft Pulley (Bottom center, largest pulley)
- Air Conditioning Compressor Pulley (Driver's side/left upper)
- Idler Pulley (Upper left, smooth surface)
- Alternator Pulley (Passenger side/right upper)
- Tensioner Pulley (Upper center, spring-loaded)
Key Note: Power steering is driven by a separate electric motor, not the serpentine belt on this engine.
Installation Procedure
Step 1: Locate the automatic belt tensioner. Identify the square hole (approx. 1/2" or 13mm) in the tensioner arm.
Step 2: Insert a suitable breaker bar or serpentine belt tool into the tensioner's square hole. Rotate the tensioner clockwise firmly against its spring pressure. This releases belt tension.
Step 3: Slide the old belt off the pulleys. Take a photo of the routing if unsure, or reference the diagram above.
Step 4: Carefully route the new belt onto all pulleys except the tensioner, ensuring ribs seat correctly in pulley grooves. Double-check all wraps. The smooth back of the belt must contact only the idler pulley and tensioner pulley.
Step 5: Rotate the tensioner clockwise again using the tool. Slide the belt onto the tensioner pulley. Slowly release tensioner pressure, allowing it to engage the belt.
Step 6: Verify routing against the diagram. Manually rotate the crankshaft clockwise 2 full revolutions using the crankshaft bolt to ensure smooth operation and seating.
Step 7: Check belt tension: The longest span (between crankshaft and alternator) should deflect 60-90 degrees when pressed firmly.
Critical Mistakes to Avoid
- Routing Errors: Reversing direction around a pulley or missing a pulley entirely.
- Incorrect Tensioner Use: Rotating the tensioner counterclockwise (causes damage), or prying against the tensioner bracket instead of using the tool in the square hole.
- Belt Rollover: Failing to ensure all belt ribs are fully seated within pulley grooves before releasing tension.
- Ignoring Alignment: Not verifying pulley alignment if parts (idler, tensioner, accessories) have been replaced recently.
Replacing worn tensioners or idler pulleys concurrently with the belt is highly recommended to prevent premature failure. Using the correct belt tool and carefully following the clockwise routing path ensures a successful installation.