
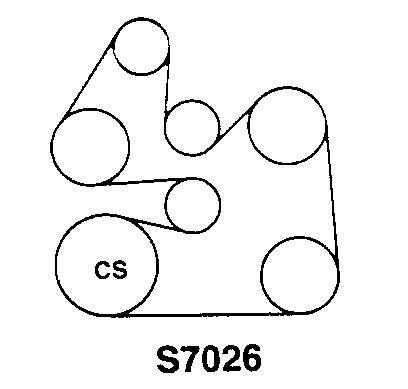
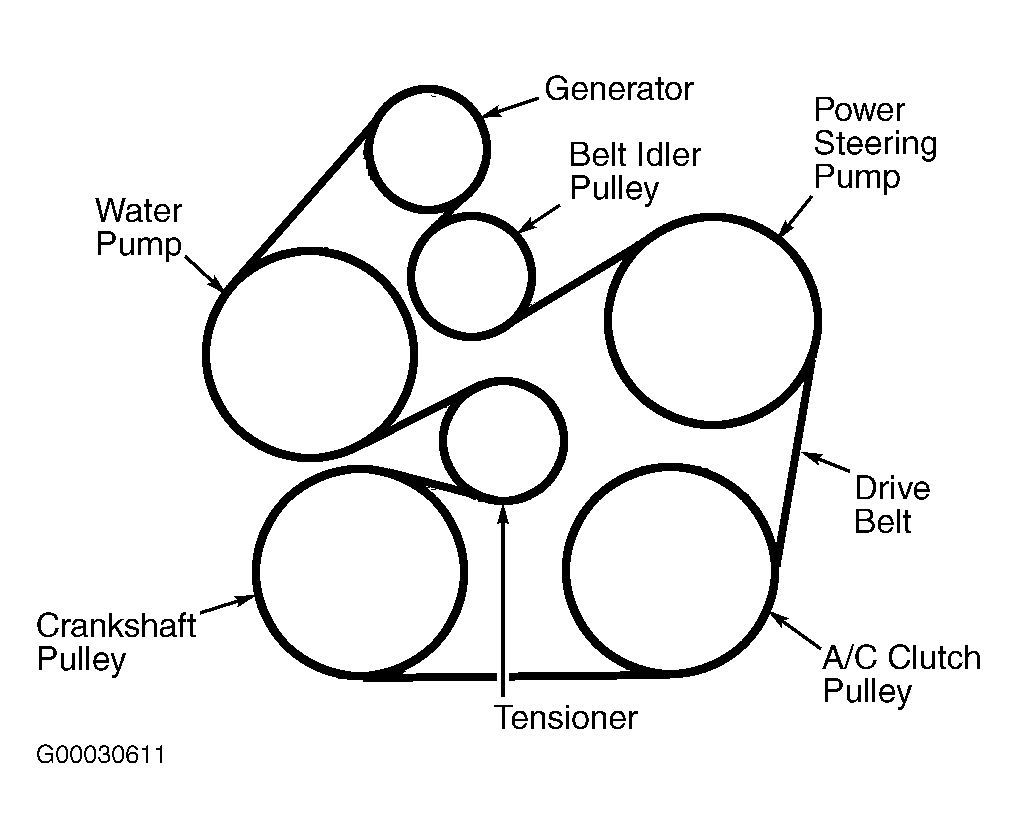
Proper belt routing is critical for your 2001 Ford Taurus serpentine belt system. Incorrect installation leads to rapid belt wear, accessory failure, overheating, battery discharge, or loss of power steering. Follow these guidelines:
Finding the Correct Belt Diagram
Locate the Label: Most 2001 Taurus models feature an explicit belt routing diagram sticker in the engine compartment. Common locations include:
- Upper radiator support crossmember
- Fan shroud
- Strut tower (driver's or passenger side)
- Underside of the hood
Thoroughly inspect these areas.
Consult Primary Sources: If the original sticker is missing or illegible:
- Use Ford Workshop Manuals specific to the 2001 Taurus (Section: Engine - Belts).
- Ensure reference matches your exact engine (e.g., 3.0L Vulcan OHV or 3.0L Duratec DOHC).
Critical Installation Steps
Map the Path Before Removal:
- Sketch the current belt path immediately before removing the old belt. Take photos from multiple angles as vital backup.
Follow the Verified Diagram Explicitly:
- Meticulously match every pulley groove on the belt to the grooves shown in the diagram. Misalignment causes derailment.
- Pay special attention to the routing around the tensioner, idler pulleys, and water pump pulley – these are frequent error points.
- The diagram determines which side of each accessory pulley the belt wraps (flat side vs. grooved side).
Understand the Tensioner:
- Use a long-handled wrench or dedicated serpentine belt tool on the tensioner pulley bolt only.
- Release tension gradually to avoid damage, allowing sufficient slack for belt installation/removal.
- Never force the belt onto pulleys by prying it over edges. This damages cords.
Post-Installation Verification
Visual Confirmation:
- Before starting the engine, manually rotate the crankshaft pulley 2-3 full revolutions using a wrench. Visually verify the belt remains correctly seated and tracking in all grooves.
- Double-check routing against your sketch/photos and the sourced diagram.
Check Tensioner Indicator:
- Most tensioners have a wear indicator mark showing the operating range. Ensure it rests within the "OK" range after installation.
Inspect Belt Condition:
- Verify the new belt is the correct part number recommended for your specific Taurus engine and accessory configuration.
- Examine the old belt for unusual wear patterns to identify potential underlying issues.