
A persistent belt squeal on your 2003 Toyota Corolla often stems from worn/dry belts, low tension, misalignment, or contamination (oil/coolant). Proper diagnosis and the correct belt routing diagram are essential for an effective fix.
Diagnosing the Source
- Visual Inspection: Examine all belts for severe cracking, glazing, fraying, or missing chunks. Pay attention to ribs.
- Contamination Check: Look for oil, coolant, or power steering fluid leaks near belt pulleys.
- Water Test (Use Sparingly): Briefly spray a small amount of water on the ribbed side of the suspected belt while the engine is running. If the squeal stops momentarily, it confirms that specific belt is slipping (low tension or worn). CAUTION: Keep hands/clothing clear of moving components.
The Critical Role of the Correct Diagram
Using an incorrect belt routing diagram for your specific 2003 Corolla engine (e.g., 1ZZ-FE) leads to misrouting, immediate damage to belts and components, and likely catastrophic failure.
Locate Your Diagram: Refer only to official sources:
- The underhood emissions label (often includes basic belt routing).
- Your vehicle's owner manual.
- A reliable, model-year-engine-specific repair manual (physical or digital). Factory service manuals (FSM) are best.
Identify Components: Before starting, ensure the diagram clearly labels:
- Crankshaft Pulley (Drive Pulley)
- Alternator Pulley
- Power Steering Pump Pulley
- Air Conditioning Compressor Pulley
- Idler Pulleys
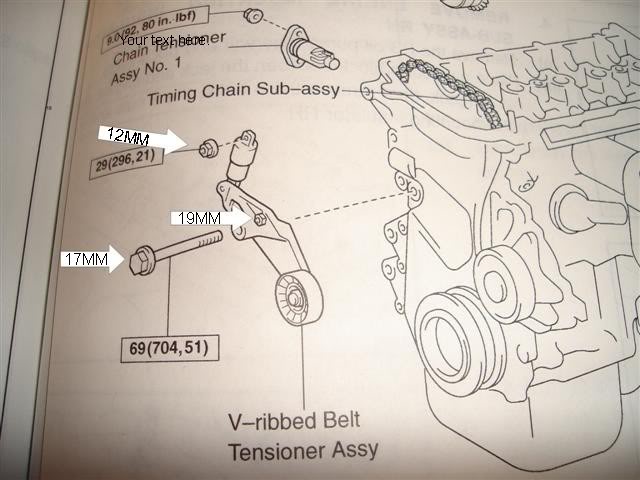
- Tensioner Pulley (Automatic) / Adjuster Point (Manual)
- Coolant Pump Pulley (Timing Belt driven - not accessory belt)
Study the Routing Path Intently. Compare it directly with your engine layout before removing the old belt.
Fixing the Squeal (Adjustment or Replacement)
Required Tools: Wrench/Socket for tensioner/adjuster (size varies), belt tension gauge (recommended for manual adjusters), gloves, safety glasses.
Safety First: Park on level ground, engage parking brake firmly, use wheel chocks. Disable ignition (pull fuel pump fuse/relay is safest) to prevent accidental starting. Allow the engine to cool completely.
1. Accessing the Belts
Remove the necessary underhood components (plastic covers, air intake ducting) to gain clear access to the accessory drive pulleys.
2. Checking/Adjusting Tension
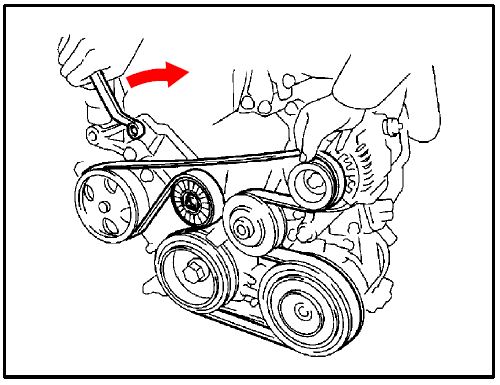
- Automatic Tensioner: Locate the tensioner indicator mark. Using the correct tool on the tensioner pulley bolt/nut, rotate the tensioner (typically clockwise or counter-clockwise) to release tension on the belt. Check the indicator alignment against the scale. If it's below the "OK" range, the belt is likely over-stretched and needs replacement.
- Manual Adjuster: Locate the adjuster bolt(s) and lock bolt(s) for the specific component (usually alternator or power steering pump). Loosen the lock bolt(s) slightly. Carefully turn the adjuster bolt to increase tension. Use a belt tension gauge on the longest span between pulleys; tension specs vary widely (consult your manual), typically 70-140 lbs deflection force. Do not overtighten. Once correct, tighten the lock bolt(s) securely while holding the adjuster.
3. Replacing a Belt
- Release Tension: Using the appropriate method above, release tension completely until the belt is very loose.
- Reference Your Diagram: Have the diagram clearly visible. Carefully note the exact path around each pulley.
- Remove Old Belt: Slip the belt off the pulleys. Avoid snagging.
- Compare New Belt: Ensure the new belt matches the old one's part number, length, width, and rib count exactly.
- Route New Belt: Using the verified diagram as your guide, meticulously route the new belt, starting by placing it on the crankshaft pulley first. Ensure it sits perfectly in the grooves of every pulley as per the diagram. Triple-check alignment.
- Apply Tension: For automatic tensioners, slowly release the tensioner arm. For manual adjusters, carefully apply tension as described in step 2.
4. Final Checks
- Verify the belt is fully seated in all pulley grooves and aligned correctly with pulleys.
- Reinstall any removed covers/ducting.
- Re-enable ignition (if fuse/relay pulled).
- Start the engine and observe belt operation for 1-2 minutes. Listen carefully: squeal should be gone. Look for wobbling pulleys or belt misalignment while running. If squeal persists or worsens, or misalignment is visible, shut down immediately and re-inspect.
Using the precise belt routing diagram prevents costly errors. Proper tension and addressing root causes (wear, leaks) ensure a lasting repair.