
Locating the correct serpentine belt routing diagram is crucial for a successful DIY replacement on your 2009 Honda Odyssey. Correct installation prevents belt failure and potential damage.
Free Serpentine Belt Routing Diagram Sources
Obtain an accurate diagram without cost:
- Owner's Manual: The primary belt routing diagram is typically located in the engine maintenance section of your original owner's manual.
- Online Repair Forums: Reputable automotive forums (e.g., dedicated Honda or Odyssey forums) often feature user-posted diagrams and photos for specific model years like 2009.
- Manufacturer Parts Retailers: Major online auto parts sellers frequently include belt routing diagrams on product pages for belts compatible with the 2009 Odyssey 3.5L V6.
- Vehicle Service Manual PDFs: Search for "2009 Honda Odyssey service manual pdf". Legitimate free excerpts or legally posted manuals sometimes contain the diagram.
DIY Replacement Steps & Tips
Follow this general process for savings:
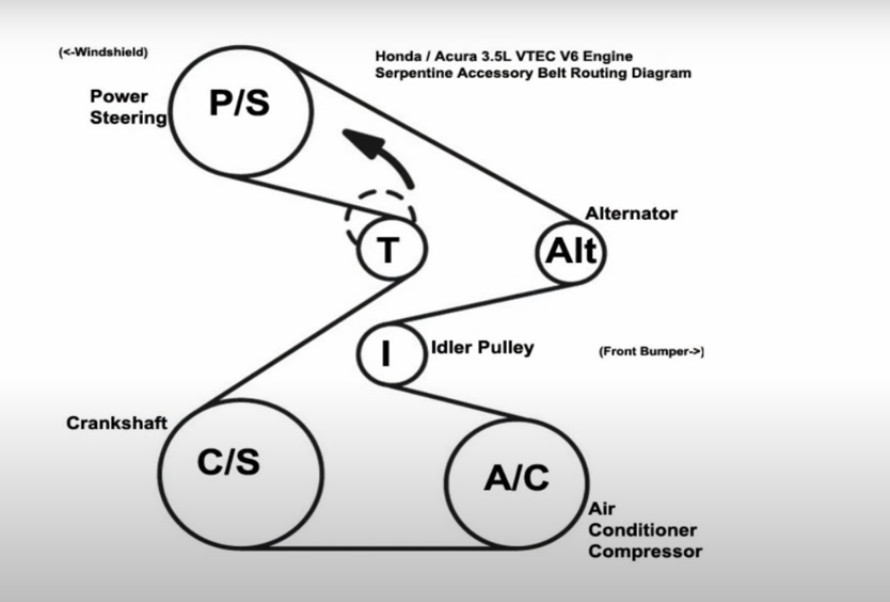
- Confirm Diagram: Double-check the diagram against your engine before starting. Verify the path around the crankshaft, alternator, power steering pump, A/C compressor, and tensioner/idler pulleys.
- Release Belt Tension: Locate the automatic spring-loaded tensioner pulley. Use a serpentine belt tool or a suitable wrench/socket (commonly 14mm, 15mm, or 17mm on the Odyssey) on the tensioner's square/hex stud. Rotate the tensioner against its spring pressure to slacken the belt.
- Remove Old Belt: Slip the old belt off the pulleys. Note its routing or take a picture with your phone as a backup reference before removal.
- Inspect Pulleys: Spin each pulley by hand. Feel for roughness, grinding, or excessive wobble. Check for glazing or cracking on idler pulleys. Replace faulty pulleys now.
- Install New Belt: Route the new belt according to the diagram, starting with all grooves seated on the crankshaft pulley. Ensure it sits correctly in all pulley grooves except the tensioner. The tensioner pulley is usually the last one to seat the belt onto.
- Apply Tension: Rotate the tensioner again to create slack and slide the belt fully onto the tensioner pulley. Slowly release the tensioner to apply proper tension automatically.
- Double-Check Routing: Visually confirm the new belt's path matches the diagram exactly.
- Start Engine: Run the engine for a minute. Listen for squealing or chirping, indicating incorrect routing or tension. Recheck if noises occur.
Significant Cost-Saving Tips
- Embrace DIY: Labor is the major cost. Doing it yourself saves $100-$250+ compared to shop rates. The 2009 Odyssey belt change is generally straightforward.
- Source Affordable Parts: Use the diagram info to purchase the correct belt online (Honda part # 38920-RKC-A01 or equivalent aftermarket like Dayco 5060900, Gates K060900). Idler pulleys are also inexpensive.
- Inspect Tensioner: While replacing the belt, check the tensioner arm for smooth operation and lack of hydraulic fluid leaks (if hydraulic type). Replace only if faulty to avoid unnecessary expense.
- Preventative Maintenance: Replacing the serpentine belt proactively (typically every 60,000-100,000 miles, check your manual) prevents costly breakdowns and damage to other components driven by it (like the alternator or A/C compressor).
- Tool Investment: The serpentine belt tool (usually under $20) or correct wrench/socket is a one-time purchase enabling future savings on belt replacements.