
Replacing the serpentine belt on a 2010 Equinox (2.4L L4 engine) requires relieving tension via the automatic tensioner. Follow these steps:
Tools & Materials Needed
- New serpentine belt (Gates K060824 or equivalent)
- 3/8" drive ratchet with 15mm socket
- Mechanic's gloves & safety glasses
- Torque wrench (optional)
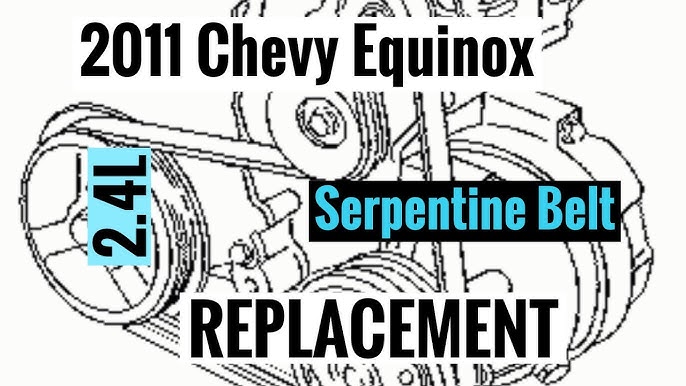
Belt Routing Diagram (Key Components)
Crankshaft pulley (center bottom) → Tensioner pulley (spring-loaded, top-left) → Power Steering Pump (top-center) → Water Pump (right) → Alternator (lower-right) → Air Conditioning Compressor (upper-right) → Idler Pulley (left of tensioner).
Step-by-Step Replacement
1. Disable Ignition & Position Vehicle: Turn off engine and engage parking brake. Raise hood and remove negative battery cable for safety.
2. Locate Tensioner: Identify the spring-loaded tensioner pulley adjacent to the alternator (driver side top of engine). Note belt path on decal near radiator if visible.
3. Relieve Belt Tension: Insert ratchet into tensioner's 15mm square slot. Rotate clockwise approximately 90° until slack appears. Slide belt off nearest pulley while maintaining tension.
4. Remove Old Belt: Slowly release tensioner and remove belt. Manually rotate pulleys to check for stiffness/seized bearings before proceeding.
5. Install New Belt: Route new belt following diagram. Align grooves on pulleys. Again rotate tensioner clockwise to create slack. Seat belt fully on crankshaft pulley first, then alternator. Verify all ribs engage pulleys.
6. Verify Installation: Start engine briefly to check tracking. Inspect for chirping/whining noises or wobbling pulleys. Torque tensioner pivot bolt to 18-22 ft-lbs if removed.
Critical Notes
- Never insert tools into pulley spokes while engine runs
- Inspect tensioner arm travel range – replace if maxed out
- Check belt alignment: Stray ribs indicate pulley misalignment
- Recommended replacement interval: 100,000 miles or 7 years