Replacing the serpentine belt on a 2015 Kia Optima requires knowledge of the correct routing path around the pulleys. Incorrect installation leads to rapid belt failure or component damage. This guide applies to common engines (2.4L GDI, 2.0L T-GDI).
Tools Needed
- New Serpentine Belt: Verify correct length/type.
- Breaker Bar (or long-handled ratchet) & Appropriate Socket: Typically 15mm or 17mm for the tensioner.
- Gloves: Recommended for grip and protection.
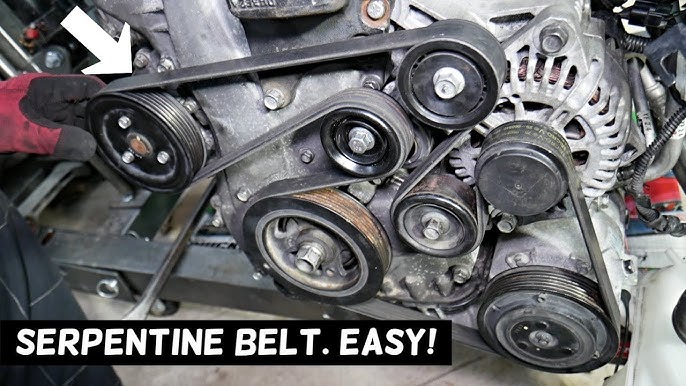
Serpentine Belt Routing Diagram
The belt path runs clockwise from the Crankshaft Pulley. Below is the standard routing:
- Crankshaft Pulley: Start here, ribbed side in the lower groove.
- Automatic Tensioner Pulley: Smooth (back) side of the belt contacts this pulley.
- Idler Pulley: Located above the crankshaft pulley, ribbed side contacts.
- Air Conditioning (A/C) Compressor Pulley: Ribbed side contacts.
- Power Steering Pump (PSP) Pulley: Ribbed side contacts.
- Alternator Pulley: Ribbed side contacts.
- Back to Crankshaft Pulley: Completes the loop.
Sequence String: Crankshaft -> Tensioner -> Idler -> A/C Compressor -> Power Steering Pump -> Alternator -> Crankshaft.
Replacement Procedure
- Locate the Tensioner: Identify the spring-loaded automatic tensioner assembly.
- Relieve Belt Tension: Insert the breaker bar/ratchet into the tensioner's square drive hole. Push firmly downwards (direction varies by model - watch the belt tension!) to rotate the tensioner arm against spring pressure until slack is created. Keep pressure applied.
- Remove Old Belt: Slip the old belt off the easiest pulley (often the alternator or idler). Slowly release tensioner pressure.
- Route New Belt: Carefully thread the new belt onto the pulleys following the exact diagram above. Ensure ribs seat properly in all pulley grooves. The belt must lie flat without twists.
- Apply Tension: Insert the breaker bar back into the tensioner. Push down again to create slack. Slide the belt onto the final pulley (usually the hardest, like the alternator or crankshaft). Double-check the routing against the diagram.
- Finalize Installation: Slowly release the tensioner pressure, allowing it to spring back and apply tension to the new belt.
- Manual Verification: Visually confirm the belt is correctly seated on every single pulley groove. Manually rotate the engine clockwise (using the crankshaft pulley bolt, if necessary) two full revolutions to ensure smooth operation and no off-track movement.
Important Tips
- Always ensure the breaker bar/ratchet is securely seated in the tensioner drive hole before applying force.
- Never run the engine without the belt correctly routed and tensioned.
- Check the tensioner pulley, idler pulley(s), and all accessory pulleys for smooth rotation, wobble, or noise while the belt is off; replace faulty components.
- Verify the new belt tracks correctly on all pulleys after engine start-up; squealing indicates incorrect routing or tension.