Pontiac Vibe Serpentine Belt Routing Guide (2003-2008)
Replacing the serpentine belt requires knowing the specific routing for your engine. Locate the underhood routing diagram sticker first. If missing, follow these general paths:
Required Tools & Safety
- New Serpentine Belt (correct length for your engine/year)
- Serpentine Belt Tensioner Wrench (typically 3/8" or 1/2" drive breaker bar/socket)
- Safety Glasses
- Disconnect the negative battery terminal before starting.
For 1.8L (1ZZ-FE) 4-Cylinder Engine
Standard Routing (Viewed facing the engine):
- Crankshaft Pulley (Bottom, largest pulley)
- Clockwise up and over the Water Pump Pulley (Left side, top-middle)
- Counter-clockwise down and under the Idler Pulley (Near alternator, tensioner path)
- Clockwise up to and around the Alternator Pulley (Right side)
- Counter-clockwise down and around the A/C Compressor Pulley (Right side, bottom)
- Clockwise around the Power Steering Pump Pulley (Left side, below water pump)
- Clockwise back to the Crankshaft Pulley.
Tensioner: Located near the alternator/idler. Rotate clockwise to release tension and remove/install belt.
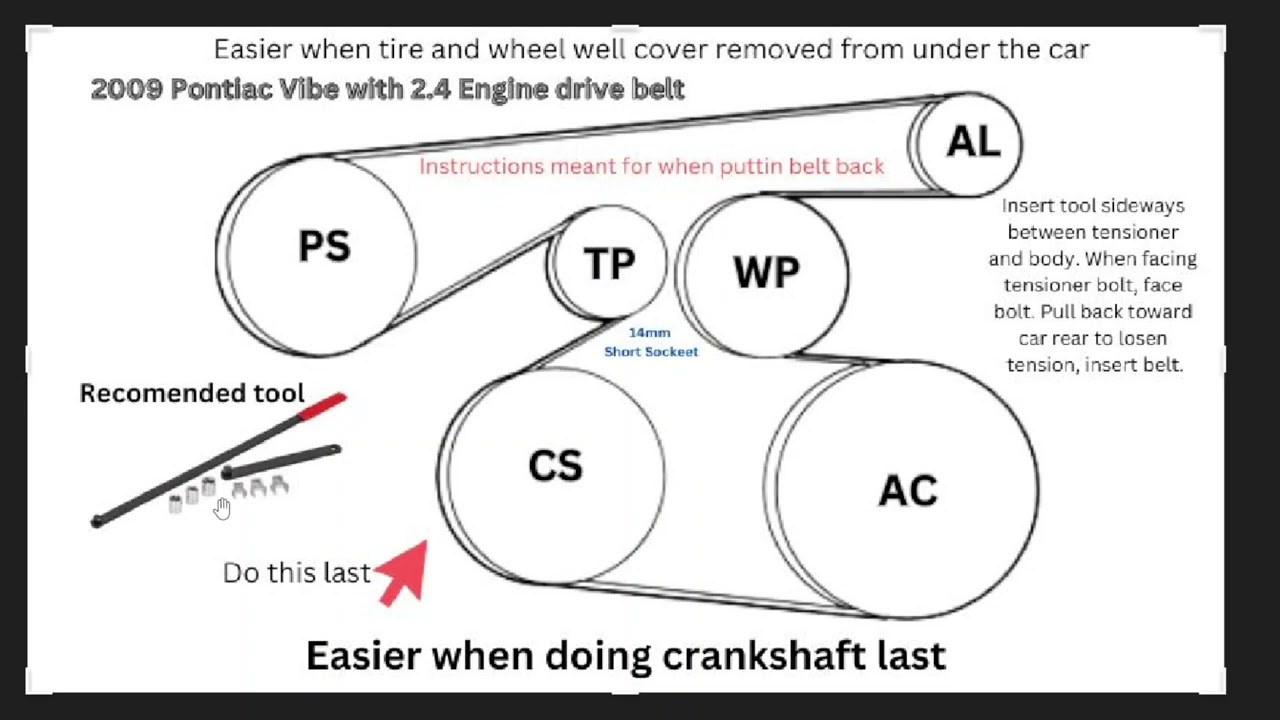
For 2.4L (2AZ-FE) 4-Cylinder Engine
Standard Routing (Viewed facing the engine):
- Crankshaft Pulley (Bottom, largest pulley)
- Clockwise up and over the Water Pump Pulley (Left side, top-middle)
- Counter-clockwise down and around the A/C Compressor Pulley (Right side, bottom)
- Clockwise up and around the Idler Pulley (Top-center, near tensioner)
- Counter-clockwise down and around the Alternator Pulley (Right side)
- Clockwise around the Power Steering Pump Pulley (Left side, below water pump)
- Clockwise back to the Crankshaft Pulley.
Tensioner: Located near the alternator/idler. Rotate clockwise to release tension and remove/install belt.
Installation Steps
- Consult diagram sticker or manual for confirmation.
- Place the new belt onto all pulleys except the tensioner pulley last.
- Insert tensioner tool squarely onto the tensioner pulley bolt/nut.
- Firmly rotate the tensioner clockwise (as far as it will easily go).
- Slide the belt onto the tensioner pulley.
- Slowly release the tensioner until fully seated. Ensure the belt is fully seated in all pulley grooves.
- Reconnect the negative battery terminal.
- Start the engine and observe the belt for several minutes. It should run smoothly without squealing or jumping off pulleys. Verify operation of all accessories (AC, power steering).