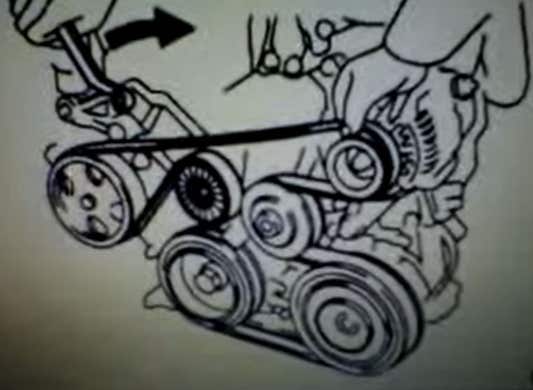
Replacing the serpentine drive belt on a 2005 Toyota Corolla (both 1.8L engines) requires precise routing. Consult your vehicle's underhood sticker for the exact diagram. Follow these steps:
Preparation
- Ensure the engine is cold and the ignition is OFF.
- Park on level ground and engage the parking brake.
- Gather necessary tools: socket wrench, breaker bar or serpentine belt tool (usually 12mm or 14mm socket for tensioner), flashlight. Sketch existing belt routing.
Belt Removal
- Identify the automatic belt tensioner pulley. It typically has a square socket fitting.
- Insert the socket wrench/breaker bar into the tensioner socket.
- Rotate the tensioner clockwise (toward the engine/away from you) to release belt tension.
- Slip the belt off one of the pulleys (often an idler or the alternator pulley).
- Carefully release tensioner pressure and remove the old belt.
Belt Routing Diagrams
Standard 1ZZ-FE 1.8L Engine:
- Route the belt clockwise around all pulleys per the diagram.
- Typical sequence: Crankshaft Pulley → Idler Pulley (Upper) → Power Steering Pump → Alternator → Coolant Pump → Tensioner Pulley → A/C Compressor → Idler Pulley (Lower) → Back to Crankshaft.
High-Output 2ZZ-GE 1.8L Engine (if equipped):
- Slightly different routing often required. Essential to follow the specific underhood sticker.
- Sequence may involve different idler pulley paths.
Belt Installation
- Ensure all pulleys and belt contact surfaces are clean.
- Route the new belt around all pulleys EXCEPT the final idler/alternator/A/C pulley near the tensioner.
- Insert the wrench into the tensioner socket.
- Rotate the tensioner clockwise again to relieve tension.
- Slip the belt onto the last pulley.
- Slowly release the tensioner, ensuring the belt seats correctly in every pulley groove. Double-check routing matches your diagram sketch.
Final Checks
- Visually confirm the belt is centered on every pulley. No ribs should hang off edges.
- Start the engine and observe the belt for smooth operation for 1-2 minutes.
- Listen for squealing or chirping indicating incorrect tension or misrouting.
- Re-check belt routing if any noises occur.
Warning: Do not disable the automatic tensioner mechanism spring permanently. Always release pressure fully before installing tools.