Diagnosing Chevy power window switch wiring issues requires understanding the basic circuit layout and systematic testing. Here's a focused approach:
Core Components & Circuit Logic
- Power Source: Typically switched 12V+ from the ignition or a dedicated fuse panel circuit.
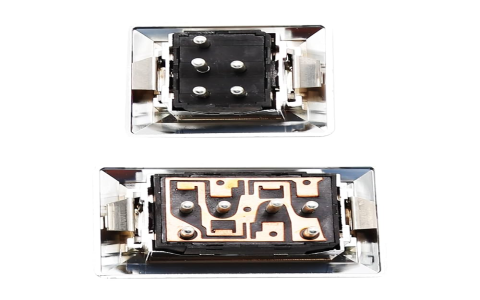
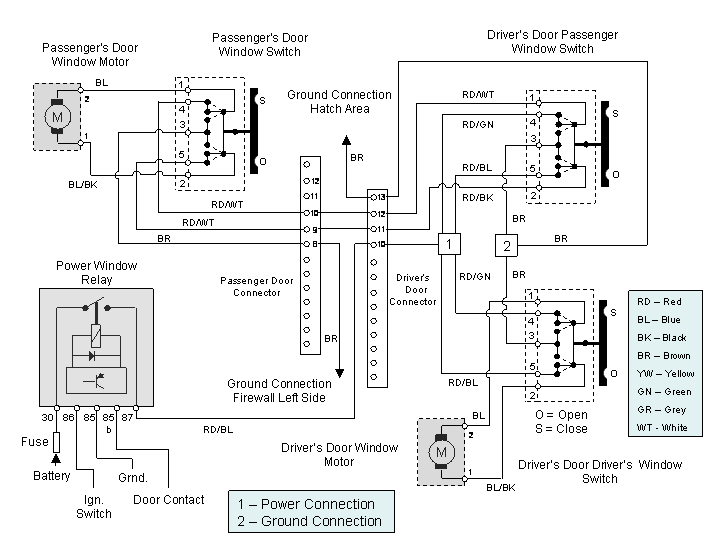
- Master Switch Assembly: Contains switches for all windows, receiving power and distributing it based on switch commands.
- Individual Window Motors: Reversible DC motors located in each door.
- Passenger Door Switches: Dependent switches routed through the master assembly.
- Key Circuit Behavior: Pressing a switch reverses polarity to the motor using internal contacts. Two wires run from the master switch to each motor: one powers "Up," the other powers "Down," grounded through the switch.
Essential Testing Tools
- Digital Multimeter (DMM)
- Test Light
- Basic wiring diagram for your specific Chevy model/year.
Step-by-Step Troubleshooting
1. Verify Power Input to Master Switch
Identify the constant 12V+ wire and ignition-switched 12V+ wire feeding the master switch connector using the diagram. Backprobe each with the DMM or test light:
- Constant 12V+: Should be live at all times (battery voltage).
- Switched 12V+: Should only be live when the ignition is ON or in ACC/RUN.
Failure Point: If either input lacks voltage, trace the circuit back to the fuse/relay panel and check related fuses or relays.

2. Test Switch Operation & Output
Focus on the switch controlling the problematic window:
- Locate the two motor output wires for that specific window on the master switch connector using the diagram.
- Set the DMM to DC Voltage. Ground the black probe.
- Backprobe one motor output wire with the red probe. Press and hold the window switch to the Up position. You should measure ~12V.
- Backprobe the other motor output wire. Press and hold the window switch to the Down position. You should measure ~12V on this wire.
- No Voltage During Switch Press: Indicates a faulty master switch assembly or poor connections within its connector.
- Voltage Only on One Wire: Specific switch contacts for one direction may be burned out.
3. Test Voltage at the Window Motor Connector
Locate the connector at the window motor in the affected door. This connector should have two wires matching those at the master switch output:
- Disconnect the motor connector.
- Set DMM to DC Voltage. Ground the black probe.
- Backprobe one terminal with the red probe. Have an assistant press and hold the master switch to Up. Read voltage.
- Backprobe the other terminal. Have assistant press and hold the master switch to Down. Read voltage.
12V Present Correctly: The motor is faulty or has poor ground.
No/Low Voltage Present: There is a break, high resistance, or short in the wiring harness running between the master switch and the door motor. Common failure areas are the rubber boot between the door and body (door jamb harness).
4. Check Ground Connection
The motor grounds through the switch. Verify the master switch's ground wire:
- Disconnect the master switch connector.
- Set DMM to Ohms (Resistance).
- Place one probe on the identified ground terminal/pin in the switch connector (using diagram).
- Place the other probe on a known good chassis ground point.
Resistance: Should be very low (less than 5 Ohms). High resistance indicates a corroded or broken ground wire/connection.
5. Check Passenger Switch Operation
If only a passenger window fails via its own door switch, but works from the master:
- The passenger switch receives commands via data lines or dedicated wires from the master module.
- Failure here often points to the passenger switch itself or the wiring connecting it back to the master switch/module.
Common Failure Points
- Broken wires within the door jamb harness boot (flexing causes fatigue).
- Internal contacts within the master or individual door switch becoming burned/corroded.
- Blown power or accessory fuse.
- Corroded or loose ground connections.
- Failed window motor (especially if voltage tests good at the motor connector).
Key Tips
- Always consult the specific wiring diagram for your Chevy model, year, and trim level. Wire colors/pin locations vary.
- Thoroughly inspect wiring, especially at pinch points like the door jamb.
- A test light is fast for presence of power/ground. A DMM is essential for accurate voltage readings and continuity/resistance checks.
- Check related fuses before detailed testing.
- Carefully clean electrical connectors if corrosion is found.
Methodical testing using a multimeter and the circuit logic will isolate the fault quickly.