Accessing the correct serpentine belt diagram for your 2003 Buick LeSabre (equipped with the ubiquitous 3.8L V6) is crucial for efficient and safe repair. Installing the belt incorrectly leads to immediate failure, component damage, or dangerous belt ejection.
Locating Your 2003 LeSabre Serpentine Belt Diagram
The primary belt routing diagram is typically found on a prominent decal:
- Underside of the Hood: The most common location.
- Radiator Support Crossmember: Directly behind or above the radiator.
- Fan Shroud: On the top or front-facing side.
If the factory decal is missing, consult a reliable repair manual specific to GM 3800 engines or utilize detailed online resources.
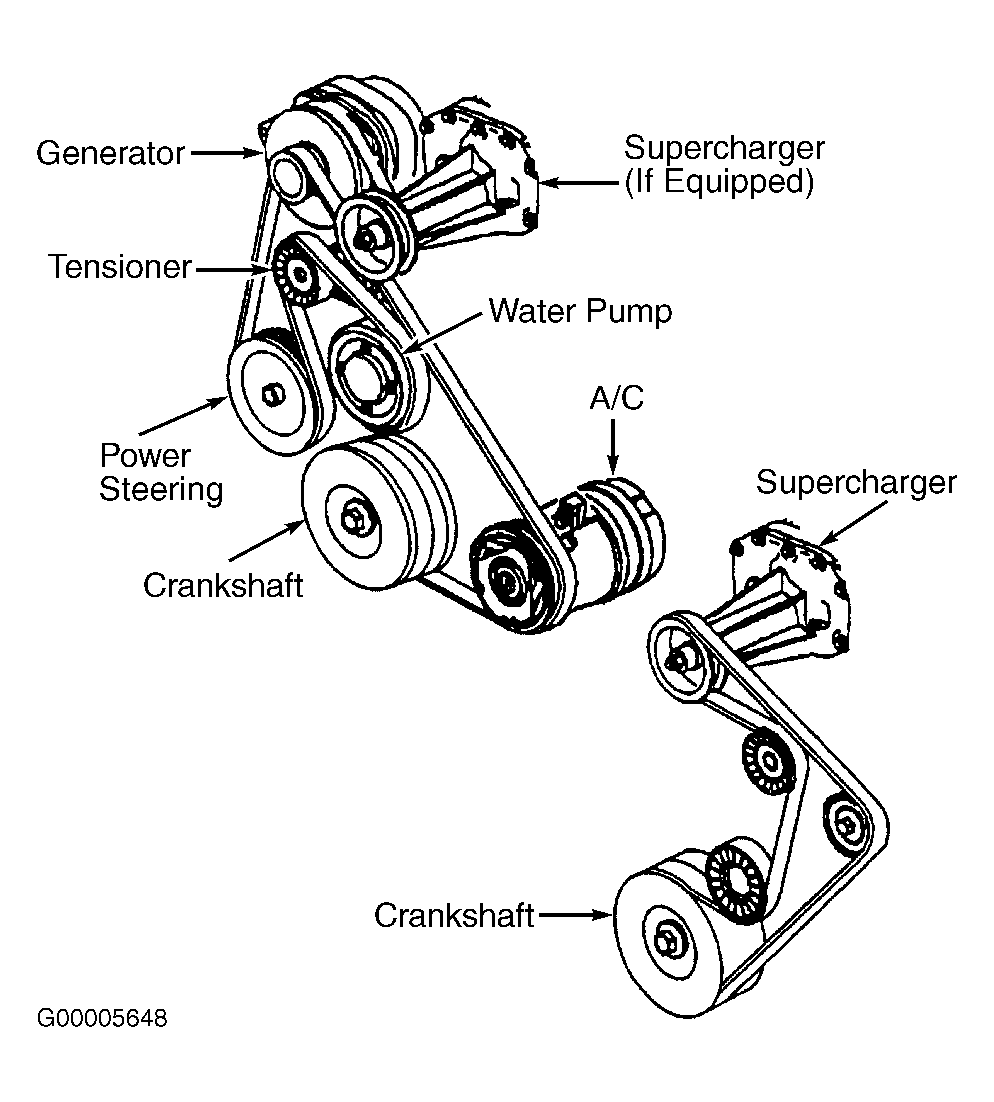
Interpreting the Diagram for Fast, Accurate Installation
The diagram shows the belt path around key components:
- Crankshaft Pulley: The drive source.
- Alternator
- Power Steering Pump
- Air Conditioning Compressor (Often bypassed by the belt during idler/tensioner replacement).
- Coolant Pump Pulley (Vital for engine cooling).
- Tensioner Pulley: Spring-loaded, critical for belt tightness.
- Idler Pulley(s): Routes the belt; note exact position.
Identify each pulley clearly before starting. Focus on the smooth versus grooved sides of the belt contacting specific pulleys.
Critical Repair Tips & Tricks for Faster Service
- Disconnect the Battery: Prevent accidental engine start during service (especially important if working near the starter/flywheel).
- Examine All Components: Thoroughly inspect the tensioner assembly (for smooth movement and proper spring tension), all idler pulleys (for smooth, quiet bearing rotation without wobble), and both sides of the belt for cracks, glazing, fraying, or missing ribs. Replace components showing any wear concurrently.
- Leverage the Tensioner: Use a breaker bar or appropriate tensioner tool on the square hole in the tensioner arm. Apply force firmly away from the belt to release tension. Never pry on the plastic pulley or arm itself.
- Mark Belt Direction or Take Photos: If reusing the old belt temporarily (not recommended for final repair), mark its running direction. Photographing the routing before removal is invaluable insurance.
- Route Bottom Pulleys First: Especially the coolant pump and crankshaft. Ensure the belt is seated correctly in the grooves of all pulleys.
- Tensioner Pulley Last: Route the belt around the idlers and alternator/PS pump, leaving the tensioner pulley for last. Release the tensioner slowly and smoothly to engage the belt.
- Double-Check Route: Before fully releasing the tensioner, manually verify the belt path against the diagram at every single pulley. Pay particular attention to the path around the A/C compressor and any intermediate idlers.
- Check Tension: After installation, start the engine briefly. Observe the belt for excessive flutter or noise. Turn off engine and manually check belt deflection midway between farthest pulleys – a firm deflection (~1/2 to 3/4 inch with moderate thumb pressure) indicates correct tension.
Fast Idler/Tensioner Replacement Shortcut (AC Bypass)
When replacing only the idler pulley or tensioner assembly on AC-equipped models:
- Install the new belt exactly as the diagram directs for the standard configuration.
- Before tensioning, carefully lift the belt off the AC compressor pulley completely.
- Proceed to release the tensioner and install the new idler/tensioner in the vacant space. Since the belt isn't wrapped around the compressor, removal and installation are significantly faster.
- Remove the new idler/tensioner retaining bolt.
- Reinstall the retaining bolt for the new component.
- Re-route the belt back onto the AC compressor pulley.
- Apply tension via the tensioner to fully seat the belt on the compressor pulley.